

Installation Manual
Loren Shower Ultra
1.Warning
Before installing the appliance: Read and follow all install instructions.
This appliance must be installed by a qualified person.
Keep this manual in a safe place once your appliance has been installed.
You may need to refer to it for general instructions or future maintenance.
In order to prevent the risk of electric shocks, make sure to connect the grounding wire of the appliance (green or yellow/green cable) to the grounding system.
The electrical installation and grounding system of this appliance shall be performed by qualified people. Do not use the neutral wire for grounding.
This appliance can heat the water over than suitable for shower. Adjusting the water temperature on the appliance shall be taken to prevent the risk of scalding.
In order to reduce the risk of injury, close supervision is necessary when the appliance is used by children, elderly and people with reduced physical sensory or mental capabilities, or lack of experience and knowledge.
Do not use the product if you think it may be frozen.
The resistivity of water at 22°C should not be less than 1300 ohms X cm.
Never attempt to install, disassemble, inspect or repair the appliance without shutting off all power to the appliance by means of the exclusive circuit breaker on the main electric switchboard.
The maximum income water temperature into the appliance is 50°C.
If any of the following conditions occur, immediately switch off the mains and contact an electrician or electrical service.
a) If the appliance or cables connected to it begins to make an odd smell or smoke;
b) If water temperature cannot be controlled;
c) Under any sign of a distinct change in performance or working;
d) Water leakage out from unexpected part of the appliance.Never attempt to repair the appliance yourself.
3 - Plumbing Preparation
Preparation
The plumbing installation must be completed before the electrical installation.
The minimum income water pressure to activate the appliance is 1.0 mca (1.5 Psi or 10 kPA or 0.10 Bar) (Fig.:01).
The maximum income water pressure is 40 mca (58Psi or 400kPa or 4Bar). Residential plumbing systems with unstable pressure or pressure above than recommended require the installation of a pressure stabilizer valve.
Before installing the appliance, let the water run out to drain out all plumbing dirt and to purge out any air bubbles/pockets and make sure there are no leaks.

Water quality and pressure may have an impact on the lifespan of the heating element, as well as on the appliance. These factors are not be covered under the manufacturer's warranty.
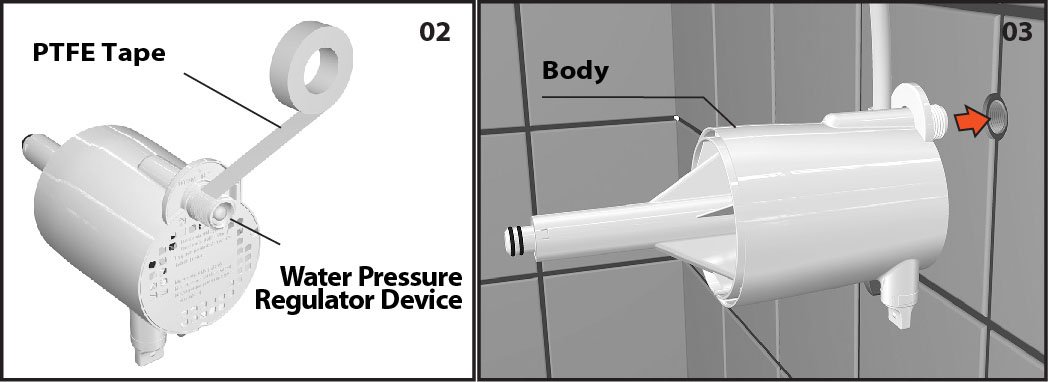
The inlet water nipple comes with an income water pressure regulator device (Fig.:02). Do not remove the device -subject to warranty loss.
The water outlet (1/2” BSP thread) must be flat level to the wall. If it’s too deep inside the wall (over than 3mm), install an extension device (does not come with the product). (Fig.:03).

4 - Plumbing Installation
Place PTFE (Teflon) tape around the nipple thread (Fig.:02).
Screw the appliance gently at the water outlet thread. Do not use tools (Fig.:04)
The appliance needs to be correctly aligned and horizontally leveled (Fig.: 04).

Spreader Installation
Align the spreader with the body and push it until it couples with the duct (Fig.:05).
Identify the dot mark on the body, approach to it and align with the dash mark on the spreader (Fig.:06).
Push the spreader until it touches the body.
Rotate the spreader clockwise, latching it (Fig.:07).
Warning: Before connecting it to the cables, in order to prevent the burning of the heating element, open the shower tap to run water through and to fill up the inner heater chamber. Check for any water leakage and shut the shower tap off.
Repeat this operation whenever the product is removed and reinstalled.

5 - Hand Shower
Installation and Usage
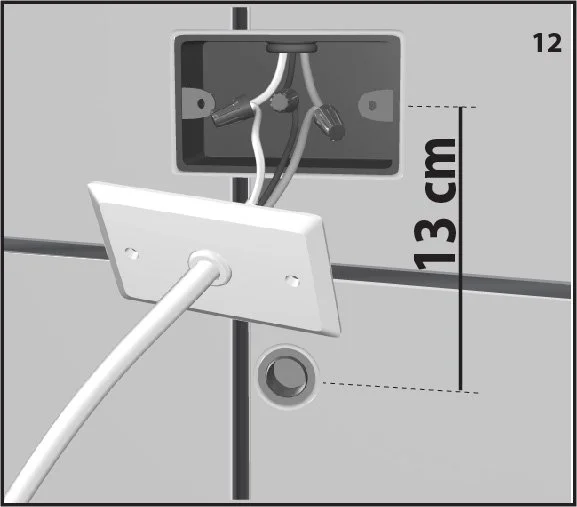
Install the hose holder on the wall in a way that it does not block the water flowing through it, and at a height easily by hands reach. Note: Check the pipes position into the wall to ensure they won’t be drilled during the hose holder installation (Fig.08).
How to use the hand shower: Push and pull (open and close) the center pin of the hand shower (Fig.:09).
Close the hand shower after use.
In case of no install of the hose and hand shower, place the hose plug to shut the water outlet (Fig.08).


7 - Grounding
Warning
In order to prevent the risk of electric shocks, make sure to connect the grounding wire of the appliance (green or green/yellow cable) to the grounding system.
The electrical installation and grounding system of this appliance shall be performed by qualified people. Do not use the neutral wire for grounding.
9 - Cleaning and Maintenance
Never attempt to install, disassemble, inspect or repair the appliance before disconnecting the power on the main electric switchboard (Fig.11).
External Cleaning: Use only damp cloth without any chemical.
Internal cleaning of the spreader: Hardness (high mineral content), dirt and debris in the water can affect the well-functioning of the appliance. If there is obstruction of the spreader holes causing reduction of water flow and/or deforming jets, it is recommended to clean the spreader.
For spreader cleaning: remove by turning it counterclockwise and follow the steps indicated at Figs.16 and 17. Then, proceed as in Fig.15. Use a brush to unblock the holes. After cleaning, reinstall the spreader back as instructed at Item 4.1 (Spreader Installation) to the heater unit. Run water through the appliance, making sure there are no leaks and the water is flowing uniformly and unobstructed through the spreader. Then, turn the circuit breaker ON.

2 - Technical Characteristics

6 - Electrical Installation
Preparing
The connection of this appliance is compatible with the residual current circuit breaker (RCD or RCCB).
Make sure the voltage of the appliance is compatible to the voltage of the electric supply (127V~ or 220V~) (Fig.10).
Run dedicated and adequate cable/wires from also dedicated and adequate circuit breaker on the main switchboard to the appliance (Fig.11).
Such installation should take into consideration the voltage (V), power rating (W) and distance from the appliance to the main switchboard, by following its requirements on the technical characteristics table.
Never attempt to install, disassemble, inspect or repair the appliance without shutting off all power to the unit by means of the exclusive circuit breaker on the main electric switchboard.


8 - Temperature Control and Usage
Warning: Set the temperature selector (Fig.13) or ON/OFF button (Fig.14) to the OFF position. Open the shower tap to run water through and to fill up the inner heater chamber to prevent the burning of the heating element. Check for any water leakage and shut the shower tap off.
Turn the circuit breaker ON at the main switchboard where the appliance is connected to.
LOREN SHOWER ULTRA MULTITEMPERATURE
Place the temperature selector in any of the heating positions (Fig.13).
The shower turns on automatically when the shower tap is opened.
For your safety and longer life of the components, the temperature selector must only be moved when the shower tap is closed.
LOREN SHOWER ULTRA ELECTRONIC
Set the ON/OFF button to the ON position and turn the temperature-selector rod to any of the heating positions (Fig.14).
The shower turns on automatically when the shower tap is opened.
For your safety and longer life of the components, the ON/OFF button must only be moved when the shower tap is closed.
The temperature can be set by turning the rod while the appliance is running.
The water temperature can also be set by opening or closing the water flow at the shower tap.
Warning: This appliance can heat the water over than suitable for shower. Adjusting the water temperature on the appliance shall be taken to prevent the risk of scalding.


