Important Before Installation
The Loren Shower Ultra must be installed by a qualified person. Before any installation, inspection, cleaning, or maintenance, the power supply must be switched off at the dedicated circuit breaker.
The product must be correctly grounded. The neutral wire must not be used as grounding. Always make sure the appliance voltage matches the electrical supply before installation.
Important Warning Before Installation
Before installing the appliance, read and follow all installation instructions.
This appliance must be installed by a qualified person.
Keep this manual in a safe place after installation for future reference and maintenance.
To reduce the risk of electric shock, the grounding wire of the appliance must be connected to the grounding system. The neutral wire must not be used as grounding.
The appliance can heat water to a temperature higher than suitable for showering. The water temperature must be adjusted correctly to help prevent scalding.
Close supervision is required when the appliance is used by children, elderly people, or people with reduced physical, sensory, or mental capabilities.
Do not use the product if you think it may be frozen.
Never install, disassemble, inspect, or repair the appliance without first switching off the power at the dedicated circuit breaker.
The maximum inlet water temperature must not exceed 50°C.
If there is an unusual smell, smoke, water temperature control issue, performance change, or unexpected water leakage, switch off the mains immediately and contact a qualified electrician or service technician.
Never attempt to repair the appliance yourself.
Plumbing Preparation
The plumbing installation must be completed before the electrical installation.
Before installing the Loren Shower Ultra, allow water to run through the pipework to remove any dirt, debris, or trapped air. Check that there are no leaks before continuing with the installation.
The minimum inlet water pressure required to activate the appliance is:
10 kPa / 1.0 m.c.a. / 0.10 Bar / 1.5 PSI
The maximum inlet water pressure is:
400 kPa / 40 m.c.a. / 4 Bar / 58 PSI
Residential plumbing systems with unstable pressure, or pressure above the recommended limit, may require the installation of a pressure stabilising valve.
Water quality and pressure can affect the lifespan of the heating element and the appliance. These factors are not covered by the manufacturer’s warranty.
The inlet water nipple includes a water pressure regulator device. Do not remove this device, as this may affect the product warranty.
The water outlet must have a 1/2” BSP thread and must be level with the wall or tile surface. If the outlet is too deep inside the wall, by more than 3 mm, an extension piece may be required.
Plumbing Installation
Apply PTFE thread seal tape around the inlet nipple thread.
Screw the appliance gently onto the water outlet thread by hand. Do not use tools to force the product into position.
The shower must be correctly aligned and horizontally level once installed.
Spreader Installation
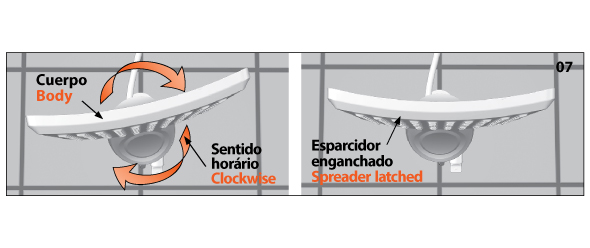
Align the spreader with the shower body and push it in until it connects with the duct.
Match the dot mark on the body with the dash mark on the spreader, then push the spreader until it touches the body.
Rotate the spreader clockwise until it locks into position.
Important Installation Note
Before connecting the appliance to the electrical supply, open the shower tap and allow water to run through the product. This fills the internal heating chamber and helps prevent damage to the heating element.
Repeat this step whenever the product is removed and reinstalled.
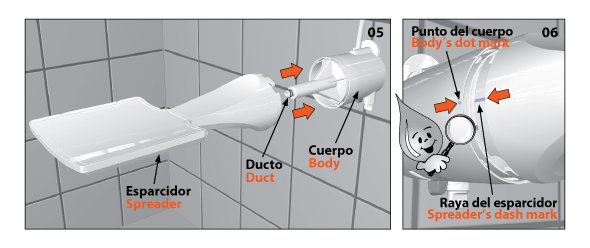
Spreader Installation
Align the spreader with the shower body and push it in until it connects with the duct.
Match the dot mark on the shower body with the dash mark on the spreader.
Push the spreader in until it sits firmly against the shower body.
Rotate the spreader clockwise until it locks securely into position.
Important Before Electrical Connection
Before connecting the appliance to the electrical supply, open the shower tap and allow water to run through the product.
This fills the internal heating chamber and helps prevent damage to the heating element.
Check for any water leaks, then close the shower tap.
Repeat this process whenever the product is removed and reinstalled.
Hand Shower Installation and Use
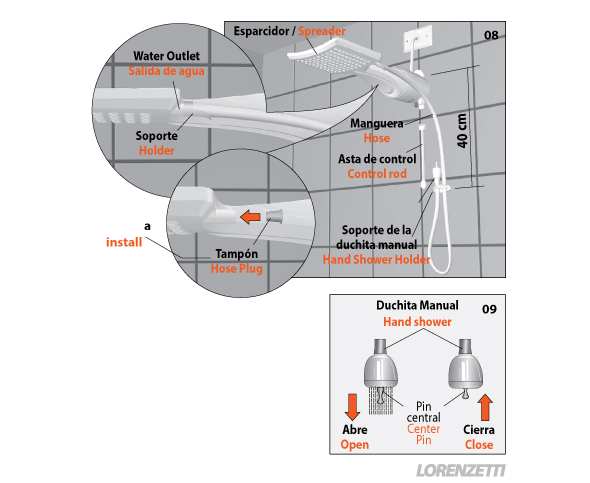
Install the hand shower holder on the wall in a position that is easy to reach and does not block the water flow through the hose.
Before drilling into the wall, check the pipe position to make sure no pipes will be damaged during installation.
The hand shower holder should be installed approximately 40 cm below the shower unit, as shown in the manual diagram.
To use the hand shower, push and pull the centre pin to open and close the water flow.
Always close the hand shower after use.
If the hose and hand shower are not installed, use the hose plug to close the water outlet.
Key Points
Easy-to-reach hand shower holder position
Push-pull centre pin for open and close control
Hose plug included for installations without the hand shower
Check wall piping before drilling
Close the hand shower after every use
Electrical Installation
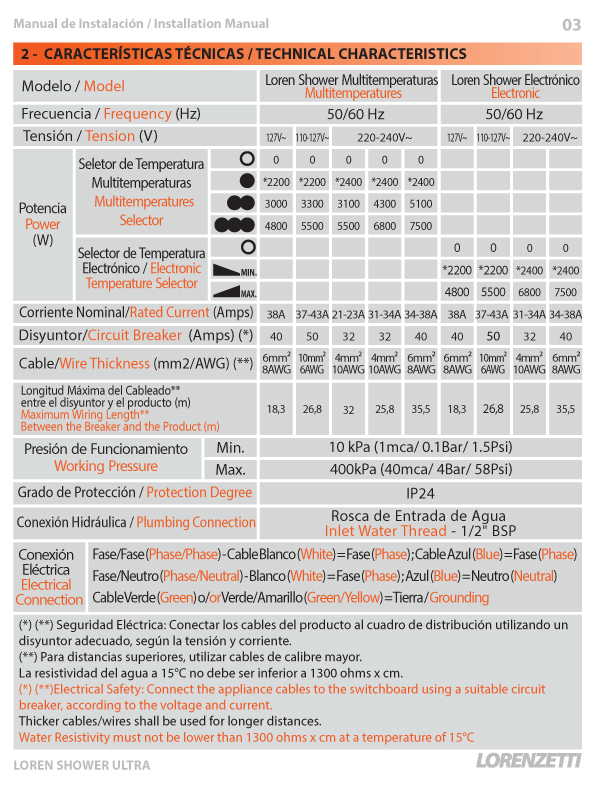
The Loren Shower Ultra must be connected to a dedicated electrical circuit with the correct circuit breaker and wiring size for the specific model.
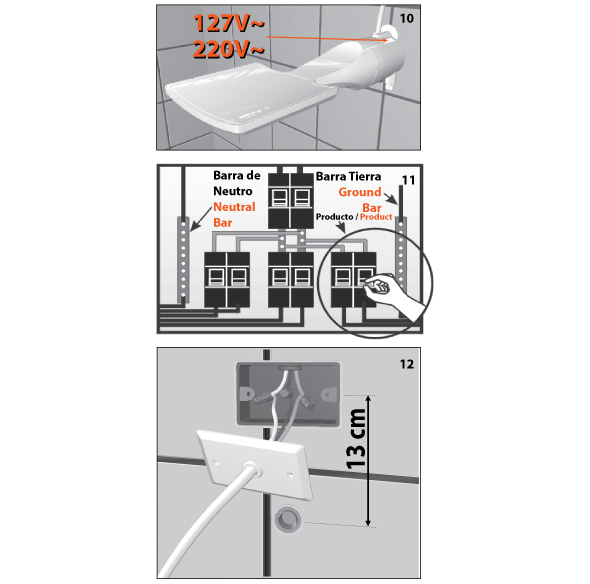
Before installation, make sure the voltage marked on the product matches the electrical supply. The manual shows voltage options for 127V~ and 220V~ / 220–240V~, depending on the model.
The electrical installation must take into account:
Voltage
Power rating
Cable thickness
Circuit breaker size
Distance from the appliance to the main switchboard
The connection is compatible with a residual current circuit breaker, also known as an RCD or RCCB.
A dedicated cable must run from the main switchboard to the appliance. The shower must not share an undersized or overloaded circuit.
A junction box should be installed 13 cm above the water outlet, as shown in the installation diagram.
Never install, inspect, disassemble, or repair the appliance without first switching off the power at the dedicated circuit breaker.
Electrical installation must be carried out by a qualified person.
Important Electrical Safety Note
Do not connect the Loren Shower Ultra using a plug and socket.
Use suitable connectors or terminals, and make sure all connections are secure.
The grounding wire must be connected correctly to the grounding system.
Grounding
Correct grounding is essential for safe operation of the Loren Shower Ultra.
To help prevent the risk of electric shock, the grounding wire of the appliance must be connected to the grounding system.
The grounding wire is the green or green/yellow cable.
Electrical installation and grounding must be carried out by a qualified person.
Do not use the neutral wire for grounding.
Temperature Control and First Use
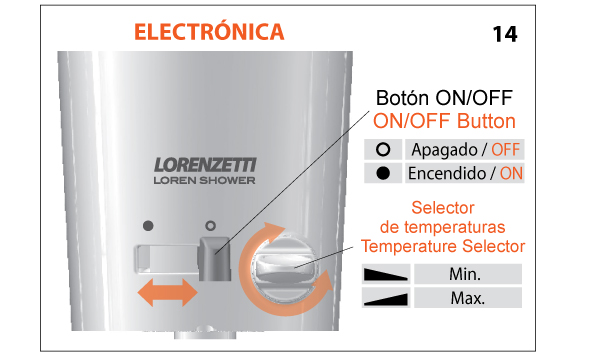
Before switching the power on, set the temperature selector or ON/OFF button to the OFF position.
Open the shower tap and allow water to run through the appliance. This fills the internal heating chamber and helps prevent damage to the heating element.
Check for any water leaks, then close the shower tap.
Once this has been done, switch the circuit breaker back on at the main switchboard.
Loren Shower Ultra Multitemperature Model
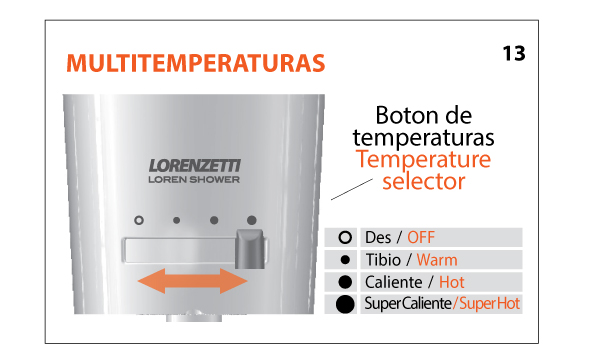
Place the temperature selector into one of the heating positions.
The shower switches on automatically when the shower tap is opened.
For safety and longer component life, the temperature selector must only be moved when the shower tap is closed.
Loren Shower Ultra Electronic Model
Set the ON/OFF button to the ON position.
Turn the temperature selector rod to the required heating position.
The shower switches on automatically when the shower tap is opened.
For safety and longer component life, the ON/OFF button must only be moved when the shower tap is closed.
The temperature can be adjusted by turning the selector rod while the appliance is running.
Water temperature can also be adjusted by increasing or reducing the water flow at the shower tap.
Important Safety Warning
This appliance can heat water to a temperature higher than suitable for showering.
Always adjust the water temperature before use to help prevent the risk of scalding.
Cleaning and Maintenance
Before cleaning, inspecting, or carrying out any maintenance, always switch off the power at the dedicated circuit breaker.
Never attempt to install, disassemble, inspect, or repair the appliance while it is connected to the electrical supply.
External Cleaning
Clean the outside of the appliance using only a damp cloth.
Do not use chemicals, solvents, abrasive cleaners, or harsh cleaning products.
Spreader Cleaning
Hard water, mineral build-up, dirt, and debris can affect the performance of the shower.
If the spreader holes become blocked, the water flow may reduce or the spray pattern may become uneven.
When this happens, the spreader should be cleaned.
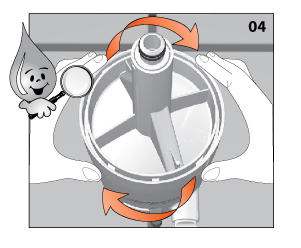
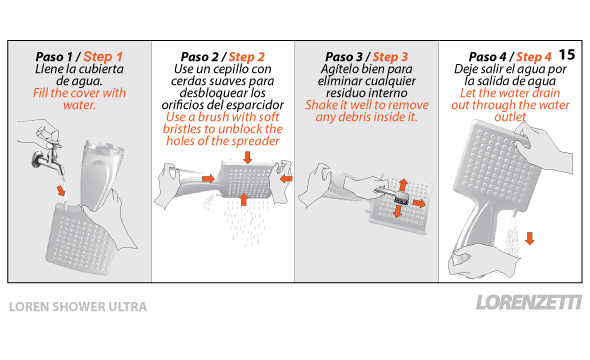
How to Clean the Spreader
Remove the spreader by turning it counterclockwise.
Fill the cover with water.
Use a soft-bristle brush to unblock the holes of the spreader.
Shake the spreader well to remove any internal debris.
Allow the water to drain out through the water outlet.
After cleaning, reinstall the spreader according to the spreader installation instructions.
Run water through the appliance and check that there are no leaks.
Make sure the water flows evenly and without obstruction through the spreader.
Once checked, switch the circuit breaker back on.
Troubleshooting
Use this section to help identify common Loren Shower Ultra issues and the recommended checks before contacting support.
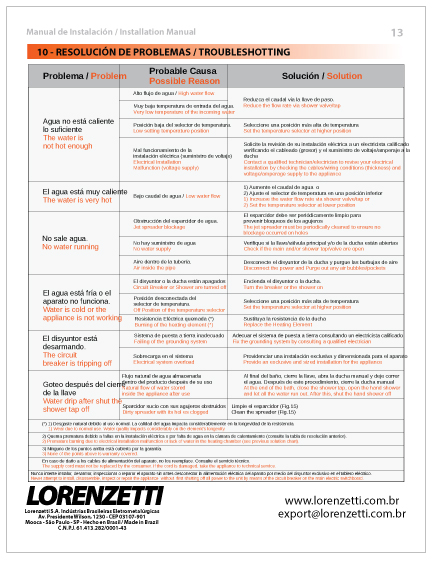
The water is not hot enough
Possible reasons:
High water flow
Very low incoming water temperature
Temperature selector set too low
Electrical installation issue, such as incorrect cable thickness or voltage supply
What to do:
Reduce the water flow at the shower tap.
Set the temperature selector to a higher position.
If the issue continues, contact a qualified electrician or technician to check the wiring, cable thickness, voltage, and amperage supply to the appliance.
The water is too hot
Possible reason:
Low water flow
What to do:
Increase the water flow at the shower tap.
Alternatively, set the temperature selector to a lower position.
No water is coming out
Possible reasons:
Blocked spreader
No water supply
Air inside the pipe
What to do:
Clean the spreader if the holes are blocked.
Check that the main water valve and shower tap are open.
Switch off the power and allow water to run through the system to purge any air pockets.
The water is cold or the appliance is not working
Possible reasons:
Circuit breaker or shower is switched off
Temperature selector is in the OFF position
Heating element may need replacement
What to do:
Switch the circuit breaker or shower back on.
Set the temperature selector to a heating position.
If the water remains cold, the heating element may need to be replaced.
The circuit breaker is tripping
Possible reasons:
Grounding system issue
Electrical system overload
Incorrect or undersized installation
What to do:
Contact a qualified electrician to check and correct the grounding system.
Make sure the appliance has a dedicated and correctly sized electrical installation.
Water drips after closing the shower tap
Possible reason:
Water stored inside the appliance may continue to drain after use.
What to do:
After showering, close the shower tap, open the hand shower, and allow the remaining water to run out.
Then close the hand shower.
Water still drips after shut off
Possible reason:
The spreader may be dirty or blocked.
What to do:
Clean the spreader according to the cleaning and maintenance instructions.
Important Notes
Do not replace the supply cord yourself. If the cord is damaged, the appliance must be taken to technical service.
Heating element wear can happen through normal use. Water quality can affect the lifespan of the heating element.
Premature heating element failure can happen if the electrical installation is incorrect or if the heating chamber was not filled with water before switching the appliance on.
Always switch off the power at the dedicated circuit breaker before inspection, cleaning, or maintenance.